Keysight M3601A allows the user to create or edit HVIs using an intuitive graphical flowchart interface. This section introduces the basics of this interface.
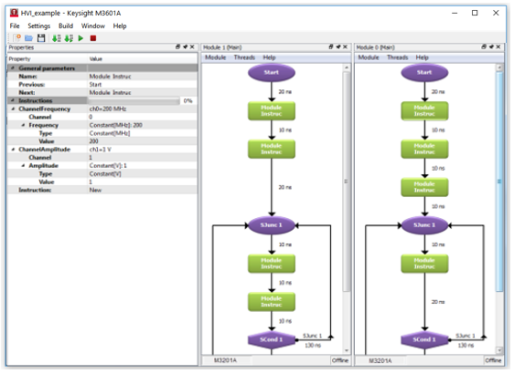
M3601A main window is shown in Figure 1. The Properties window located on the left part of the screen is a multipurpose tool that shows the instructions and properties of all the objects which are activated by a mouse left-click. The Flowcharts of the two hardware modules comprising this HVI can be identified on the right side of the window. These flowcharts contain statements (different shaped boxes) and time arrows (Section Timing Arrows) which define the execution of the HVI.
Figure 1: M3601A HVI Design Environment
An HVI is defined by a group of hardware modules* that are fully synchronized, working as a single integrated hardware module. Therefore, the creation of a new HVI starts by selecting its modules (Figure 2), after clicking File ⇒ New HVI Project.
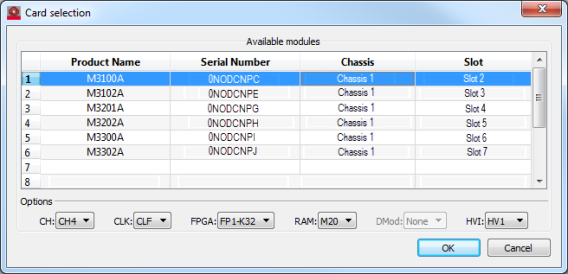
Figure 2: New Hard Virtual Instrument (HVI) project creation. Dialog to select the hardware modules that will become part of the HVI.
An empty project shows all the hardware modules* with the Start. A mouse right-click over any statement (like the Start Statement ) opens a menu to create and delete new flowchart elements (see HVI Flowcharts to learn more about these elements).
HVI Projects can be compiled and executed directly within M3601A using the Build option on the main menu. An HVI Project can also be compiled into an HVI object (File ⇒ Generate HVI...). With this file, the HVI can be executed from a VI using the Keysight SD1 Programming Libraries, e.g. from C/C++, LabVIEW, Python, MATLAB, etc. See Software Programming Guide: HVI-VI Interaction for more information about the interaction between VIs and HVIs.
Each hardware module may have different options, e.g. an AWG may be able to define arbitrary waveforms, etc., which are accessible from the module menu in the Main thread window (Module ⇒ ...).
Each hardware module has 16 local registers (32 bits integers) that can be used in the programming of the HVI. Most statements can write or read into/from these registers. Registers can be read/written between modules, providing a fast tool to transfer small amounts of data (see how to access external variables External Variable Access).